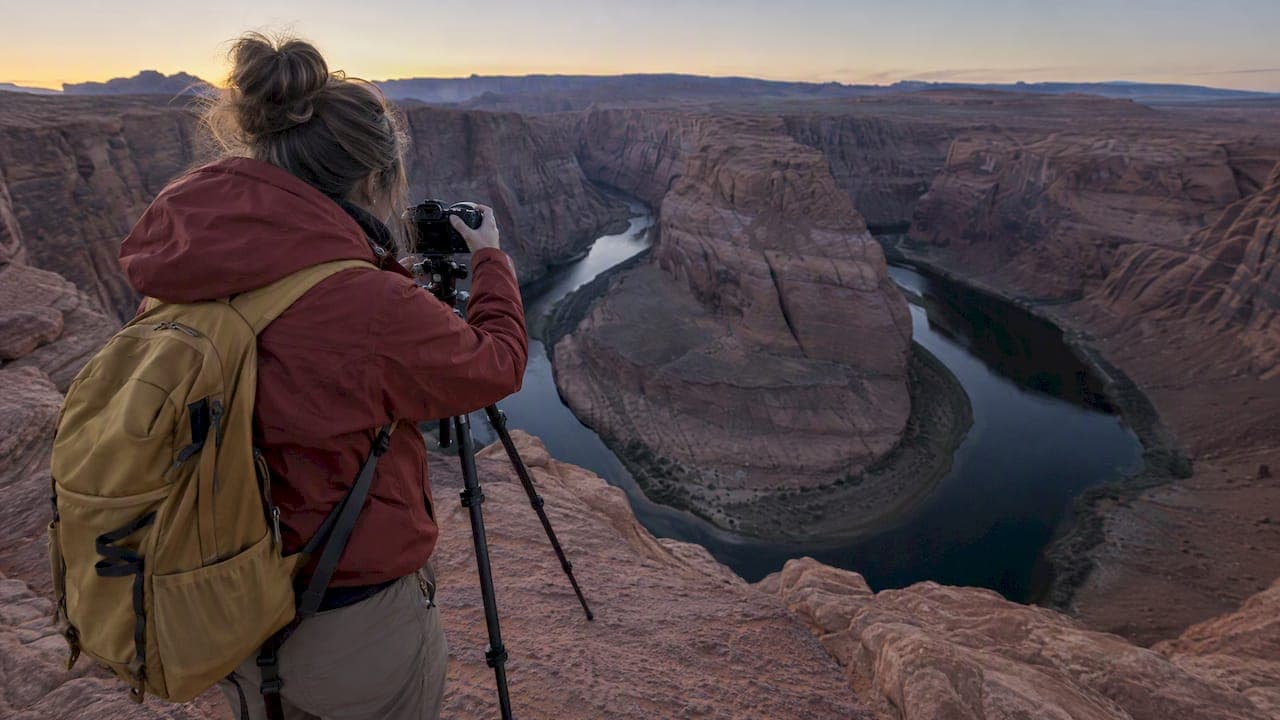
Bring an ultra-wide lens, a sturdy tripod, and a plan for the exact light you want, and you will walk away with strong images on your first visit. Time your arrival for either sunset color or mid-morning evenness, carry enough water for the heat, and check the National Park Service site before you go. Local private tour companies that run tours through the area can fill in the local logistics gaps that catch first-timers off guard.
TL;DR:
- Using a graduated ND filter can often replace exposure bracketing, saving time and producing cleaner images in high-contrast lighting.
- Arriving early or during mid-morning hours generally results in fewer crowds and more balanced lighting conditions on the overlook.
- A 14 to 16mm ultra-wide lens captures the full meander without stitching, while a telephoto offers compressed river shots from higher vantage points.
- Proper tripod stability, including digging legs into sand and weigh-down techniques, is crucial due to wind and uneven terrain at Horseshoe Bend.
- Planning your shoot around the ideal light for your desired mood—sunrise for warm tones or mid-morning for even exposure—maximizes photo quality.
Table of Contents
- 1. Practical Photography Tips for Horseshoe Bend
- 2. Gear Checklist and Recommended Lenses, Filters, and Accessories
- 3. Choosing Sunrise, Sunset, Mid-Morning, or Night for Different Results
- 4. Composition Techniques Tailored to Horseshoe Bend
- 5. Planning, Logistics, and Safety Every Photographer Should Know
- 6. Managing Extreme Dynamic Range in Camera and in Post
- 7. When Local Expertise Makes the Difference
- A Quick Note From the Field
- Private Tours That Take the Guesswork Out of Your Shoot
- FAQ
- Sources
1. Practical Photography Tips for Horseshoe Bend
Getting a strong shot at Horseshoe Bend depends less on luck and more on a short list of decisions made before you leave your hotel. Here is the order of operations that works for most visitors, whether you are shooting a mirrorless body or a phone.
- Decide your light first. Sunset gives you the richest colors on the cliff walls but deeper shadows on the river; mid-morning gives you flatter, more even light across both rock and water.
- Arrive 45 to 60 minutes before your target light so you can walk the rim and scout a composition without rushing.
- Scout before you shoot. Walk a few different spots along the overlook rail before committing to one framing; the angle changes more than people expect in just a few yards.
- Use foreground rock to add depth. A low, wide stance that includes a slab of sandstone in the bottom third of the frame gives the image scale that a flat horizon shot lacks.
- Level your tripod before anything else. A tilted horizon on a meander this symmetrical is obvious and hard to fix cleanly in post.
- Weight your tripod in sand or wind. Spread the legs wide, dig the feet in slightly, and hang a bag or your camera strap from the center column for stability.
- Bracket your exposures. Shoot three to five frames at one-stop intervals so you can recover both the bright sky and the shadowed canyon floor later.
- Use a graduated ND filter instead of bracketing when you want a single clean frame without merging exposures afterward.
- Switch to manual focus and focus roughly a third of the way into the scene to keep both the foreground rocks and the far canyon wall sharp.
- Shoot RAW, not JPEG. The dynamic range at this overlook punishes compressed files; RAW gives you the latitude to pull back blown skies and lift shadowed rock.
- Carry more water than you think you need. There is no water source on the trail itself, and the walk back is uphill in full sun for most of the day.
- Pack out everything you bring in, including lens wipes, snack wrappers, and filter packaging.
- Check conditions and hours before leaving, since wind and dust can change a shoot plan quickly in this part of Arizona.
Pro Tip: Shoot a quick bracket set within the first five minutes on the overlook, before you start composing. If the light shifts fast, you will already have a safety exposure in the bag.
2. Gear Checklist and Recommended Lenses, Filters, and Accessories
The gear list for Horseshoe Bend is short, and most of it matters more here than at a typical landscape stop because of the extreme width of the scene and the harsh midday light.
- Ultra-wide lens: aim for 14 to 16mm on a full-frame camera or roughly 10 to 12mm on an APS-C body to fit the entire meander in a single frame without stitching multiple shots together.
- Telephoto lens (optional): a 70 to 200mm range is worth packing if you want compressed shots of the river curve from a higher vantage point along the rim, isolating the water's color against the rock.
- Graduated ND filter: a 3 to 4 stop soft-edge GND helps balance a bright sky against the darker canyon walls in a single exposure, which is useful when you do not want to merge brackets later.
- Polarizer: cuts haze and deepens the blue of the river, though it can also darken skies unevenly on an ultra-wide lens, so test before committing.
- Tripod: a model with splayable legs and a low-angle setting works best on the sandy, uneven ground near the rail.
- Remote shutter release: reduces camera shake during long exposures, especially useful for blue-hour or night shots.
- Spare batteries and memory cards: cold mornings and heavy bracketing drain both faster than expected.
- Phone shooters: use the built-in ultra-wide camera mode and brace your phone against the rail or a small tabletop tripod rather than shooting handheld.
Pro Tip: If you only pack one filter, make it the graduated ND. It solves the single biggest exposure problem at this overlook without adding post-processing time.
3. Choosing Sunrise, Sunset, Mid-Morning, or Night for Different Results
Horseshoe Bend's overlook faces generally west, which means the time of day you choose changes the mood and difficulty of the shot more than almost any other factor.
- Sunrise: the canyon walls light up with warm tones while the river below can stay in shadow longer, creating higher contrast and a trickier exposure.
- Mid-morning (roughly 9 AM to 2 PM): light spreads more evenly across the river and rock, which is why many photographers find this window easiest for a single clean exposure without heavy bracketing or filters.
- Sunset: this is the classic postcard window, with rich orange and red tones on the cliffs, though the river can fall into deep shadow fast, so bracket early.
- Night and astrophotography: the overlook sits far enough from city light pollution that star trails and Milky Way shots are possible in the right season; a tripod and long shutter speeds in the 15 to 25 second range are the starting point.
Horseshoe Bend stays open from sunrise to sunset year-round, with the busiest crowds typically arriving between 9 and 11 a.m. and again from 4:30 to 6:30 p.m., according to AZCentral's visitor guide. If you want fewer people in your frame, a weekday mid-morning session outside those windows is usually your best bet.
4. Composition Techniques Tailored to Horseshoe Bend
The meander itself does most of the compositional work, but a few deliberate choices separate a postcard shot from a forgettable one.
- Anchor the frame with foreground rock. Get low and let a chunk of sandstone fill the bottom corner of the shot to give the image a sense of scale against the drop below.
- Place the curve off-center. Rather than centering the bend, let it sweep from one corner toward the opposite third of the frame for a more dynamic composition than a dead-center shot.
- Change your vantage point. Moving even 20 feet along the rim shifts how much of the river you see and how tightly the canyon walls frame the water.
- Decide between a single ultra-wide frame and a stitched panorama. A wide lens alone is faster and avoids stitching errors, but a panorama lets you capture more detail if you bracket each frame and keep 20 to 30% overlap between shots, matching exposure throughout.
- Use people deliberately or not at all. A lone figure near the rail can add scale to an otherwise empty composition, but a crowded rail is better cropped out or avoided entirely by shooting during quieter hours.
5. Planning, Logistics, and Safety Every Photographer Should Know
A great shot means nothing if you are caught off guard by the heat, the walk, or the fees. A few facts to lock in before you go:
- The trail to the overlook runs about 1.5 miles round-trip on a hardened path with limited shade, and the viewing deck has railings while much of the surrounding rim stays unfenced, according to the National Park Service.
- Page, Arizona's 2026 fee schedule lists a $10 parking fee for passenger vehicles and $5 for motorcycles, with separate commercial rates for buses and vans; confirm current pricing before your trip since schedules can change.
- The site is open sunrise to sunset, and the hottest midday hours in summer are worth avoiding for both comfort and harsh light.
- There is no water along the trail, so carry more than you think you need, wear sturdy footwear for loose sand and uneven rock, and apply sun protection before you start walking.
- Drones are not permitted at Horseshoe Bend, and Leave No Trace principles apply throughout the site.
For a closer look at trail hazards and the drop-off near the rim, our Horseshoe Bend safety guide covers precautions worth reading before you visit, and our parking guide breaks down where to park and what to expect on busy days.
6. Managing Extreme Dynamic Range in Camera and in Post
The gap between the bright sky and the shadowed canyon floor at Horseshoe Bend can exceed seven stops of dynamic range, according to FotoTripper's photo guide, which is enough to blow out highlights or crush shadows in a single exposure on most cameras.
- Bracket three to five frames at one-stop intervals, then merge them in Lightroom or Photoshop's HDR tools to recover detail across the full range.
- Reach for a 3 to 4 stop graduated ND filter when you want a clean single frame without the extra merging step, particularly useful at sunrise or sunset when colors shift fast.
- For long exposures or star trails, use a tripod and a remote release, keep ISO low to control noise, and expect shutter speeds in the 15 to 30 second range for night shots, a setup recommended by VisitPageAZ's photography guidance.
- In post-processing, start with white balance and highlight recovery before touching contrast, then use local masking to deepen the river's blue-green tone and bring out texture in the sandstone without over-sharpening.
Pro Tip: If your bracket set still looks flat after merging, boost local contrast on the canyon walls separately from the river. Treating them as one adjustment usually mutes the color difference that makes this shot work.
7. When Local Expertise Makes the Difference
A lot of what goes wrong at Horseshoe Bend has nothing to do with camera settings. It is arriving at the wrong time, misjudging the parking situation, or underestimating the walk back in full sun.
- A guided visit removes the guesswork around timing, parking, and trail conditions, letting you focus on composition instead of logistics.
- For current, authoritative details on fees and safety, our Horseshoe Bend safety guide and our Horseshoe Bend parking guide lay out what to expect before you arrive.
- Navajo-guided itineraries that pair Antelope Canyon with Horseshoe Bend, like the one on our Horseshoe Bend page, can help photographers time their visit around good light while respecting tribal land rules at Antelope Canyon.
A Quick Note From the Field
The first time I shot Horseshoe Bend, I centered the bend dead in the middle of the frame and ignored the foreground entirely. The shot looked flat, like a postcard anyone could buy. Moving ten feet left and crouching low with a slab of rock in the foreground fixed it instantly. Three things to repeat before you go: pack the ultra-wide and a tripod, pick mid-morning for even light or sunset for color, and carry more water than feels necessary.
— Chris
Private Tours That Take the Guesswork Out of Your Shoot
If you would rather spend your limited time in Page composing shots instead of figuring out parking and timing, our Antelope Canyon & Horseshoe Bend tour pairs both locations in a single private, guided day. It is worth booking when your schedule is tight, you want a guide who knows the current access rules, or you simply want someone else handling the logistics while you focus on light and composition.
- We run fully private itineraries with a custom vehicle and an expert guide for your group only.
- Our broader lineup of private Grand Canyon tours covers everything from sunset shoots to multi-stop sightseeing days if you want to extend your trip beyond Horseshoe Bend.
If photography technique for tight spaces interests you beyond the canyon, this vacation rental photography guide from our partners at Emerald Coast By Owner covers useful framing lessons that translate well to landscape work.
FAQ
What is the best time to photograph Horseshoe Bend?
Sunset gives the richest color on the canyon walls, while mid-morning hours, roughly 9 AM to 2 PM, tend to light the river more evenly for single-exposure shots, according to AZCentral. Choose based on whether you want drama or balance.
What is the best lens for Horseshoe Bend and Grand Canyon photography?
An ultra-wide lens in the 14 to 16mm range on full-frame or 10 to 12mm on APS-C fits the entire meander without stitching multiple frames. A telephoto in the 70 to 200mm range is a useful second option for compressed shots of the river from higher vantage points.
What time of day is busiest at Horseshoe Bend?
Crowds typically peak between 9 and 11 a.m. and again from 4:30 to 6:30 p.m., according to AZCentral. A weekday visit outside those windows usually means fewer people in your frame.
What is the best way to see Horseshoe Bend if I want help with logistics?
A private, guided visit handles timing, parking, and access details for you, which suits photographers short on time or unfamiliar with the area. Our Antelope Canyon & Horseshoe Bend tour pairs both sites with Navajo-guided access in a single private day.
Do I need a filter or can I rely on bracketing alone?
Either works: a 3 to 4 stop graduated ND filter gives you a clean single frame, while bracketing three to five exposures and merging them in post recovers the same highlight and shadow detail, per FotoTripper's guide. Choose bracketing if you want more control in post, or a filter if you prefer to finish faster in camera.
Sources
- Horseshoe Bend - Glen Canyon National Recreation Area (National Park Service)
- Horseshoe Bend photo guide — FotoTripper
- 2026 Consolidated Fee Schedule — City of Page
- Tips for capturing Page, Arizona's spectacular attractions — VisitPageAZ